How to Make Progression .Gif Images

If my “archive categories” widget is to be believed, at this point I’ve written 115 art-related posts on this website. That’s pretty surprising to me, but I guess they add up over time. Through all of that text about artwork, it seems I’ve developed a pattern to my writing. I hope it doesn’t come off as robotic, but I do have certain marks I try to hit in a standard post about a drawing. Typically, it goes something like this:
- Topical introduction, possibly referencing the last post.
- Discussion of something I thought was interesting. Sometimes it’s directly related to the artwork, but not always.
- An image of the portrait
- A discussion of the process, my feelings on how it went.
- A progression .gif.
One of these components I occasionally get asked about (if occasionally means 2-3 times in 115 posts) is that progression .gif I include at the end. In the comments section of my last write-up, artist Christine Mallaband-Brown mentioned these progression .gifs, which made me think of something I’ve had on the back-burner for a while. I thought it might be useful to share how to actually make these progression .gifs. It’s not too complicated, but if you’ve never made one before, it can seem difficult.
Fortunately, there are a ton of ways to make these. The important first step is to remember to take photos of your artwork as you create it. Once you’ve got your images, then you need to find a tool. There are online resources – websites where you can upload images and build the .gifs. Some software programs, such as Adobe Photoshop, and smartphone apps can also make them. I’m going to focus on steps to use my two favorite methods. They aren’t necessarily better than others, they’re just the tools I’ve grown accustomed to.
EZGIF.com, https://ezgif.com/maker
The first tool I’ll discuss is the one I use most often; a website called EZGIF.com. It seems like the best combination of easy-to-use interface with relatively strong customization. From what the website says, the images you upload are only temporarily stored. You don’t have an account that you can save things to. Basically, whatever .gifs you create, you must download before you leave. To get started, click Choose Files and pick the images you want to use.

Now, click “Upload and make a GIF” and the screen will change a bit. You’ll be presented with a layout of your images. You can reorder them by using your mouse to drag and drop. There is also a prompt to resize the images if they aren’t all uniform. I like to first see how it looks without resizing, it’s not always clear to me which looks better.

Once you’ve got the images arranged in the right order, you can check some options. The most important to me is Delay Time, which I always set to 129 (I don’t know why I don’t just go with 130).

When you’re satisfied with all of that, just click “Make a GIF” to finalize it. The screen will change again after some processing.

Now, the .gif is ready to download if you like what you see. The save button is on the bottom right corner, which you’ll have to use if you don’t want your .gif to completely disappear after you leave the website. You can also do a few additional things, like add text to the animation, optimize (to make the file size smaller), and crop.
Google Photos, https://photos.google.com/
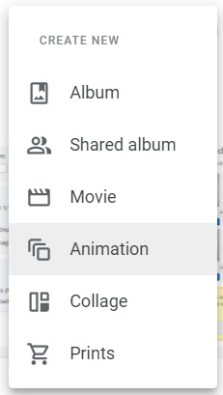
Google Photos is another resource that is pretty easy to use. You can utilize either the smartphone app or the website. It offers substantially less customization compared to EZGIF, but the process is pretty much as easy as it gets. Just click the plus sign (“Create“) to bring up a menu, then select “Animation.”

Select between two and 50 images to include in your .gif file, and that’s it! Click Create on the right, and the .gif is made. As I said, there aren’t any additional options, but there also aren’t additional complications or steps to make it confusing.
Other Popular Options
Although I almost exclusively find myself using EZGIF, and Google Photos otherwise, there are a few tools that are fairly popular with other folks. Two are websites somewhat similar to GZGIF called Imgur (https://imgur.com/) and Giphy (https://giphy.com/create/gifmaker). The basic steps are similar, in that you upload your images then use the site to create your .gif. The most significant difference that Giphy and Imgur both allow you to create accounts and store what you made. I’ve found EZGIF to be a cleaner interface, though. And I actually prefer the idea of my uploaded files being wiped from their servers automatically.
I also see recommendations for using Adobe Photoshop to create .gif image files. I don’t actually have Photoshop, so it’s not an option for me. But from what I know of the software, I’m guessing this path offers some incredible levels of customization. If you have access to Photoshop and are comfortable using it, I’d definitely recommend giving it a try.

Also, since we’re talking about them…there is actually some disagreement on how to pronounce .gif. Apparently, the creator of the file format said it should be pronounced “jif” (soft “g” as in gym). I just want to go on record – I think he’s wrong here. The extension .gif is short for “graphics interchange format,” not “japhics interchange format.” As bold as it is for me to disagree with the guy who created it, it’s equally bold of him to change the pronunciation of the word graphics. Mark me down for hard “g” .gif in this completely nerdy battle!

That’s it for this short .gif instructional guide. I hope you’ve found it useful!
Image Credits: EZGIF (screen captures of their site, Google Photos (screen captures), Imgur (logo in header), Giphy (logo in header), Reddit user 1emufh (Gif/Jif Season Image), Tech Spot (Peanut Butter battle)
Great post! I learned about your process for creating progression GIFs. For those interested in converting videos to GIFs or editing videos/images online, check out (removed) . This free browser-based toolkit lets you convert videos to GIFs, resize/compress GIFs and videos, convert images (like JPG→PNG), and much more. It’s quick and requires no registration or watermark, making it ideal for artists and marketers.
Thank you! My site doesn’t typically allow links in comments, but I appreciate the comment!
Pingback: Art Show Entry, Dallas OAC ART214 Exhibition - Amdall Gallery
Pingback: Sharing Multiple Drawings - Another Geralt and Ciri - Amdall Gallery
Pingback: Holiday Portrait Gift - Amdall Gallery
Pingback: Youtuber Art Series, Marques Brownlee (MKBHD) - Amdall Gallery
Thank you! I’m keeping this ost so I can try and create a gif. It will take me a while but it’s very useful. Thanks again!
Awesome! Always glad to help – if you have any questions, feel free to ask. I’m no expert, but I do enjoy messing around with stuff like this
I’ll have to write it down so I can follow it…
Sounds like a good plan to me. You might consider trying the Google Photo option first, it’s definitely a shorter process. You can’t really control how fast the images go, but it’s a good introduction I think
Well there you go, I’ve been using Google photos since they invented it and I’ve never tried the animation feature. Learnt something new.
Makes me feel a bit so sloppy on my posts. I don’t put any thought into the majority of them. “Here’s my picture” and then if I’ve got the time, and the inclination, then I’ll add “and here’s how I did it”. 😳
It’s definitely Gif G G G all the way. Jif is a brand of floor cleaner.
Isn’t that cool? I do wish Google Photos allowed you to create .gifs out of videos, but right now it’s just still frames. Despite the fact that the app will randomly automatically make looped .gifs from videos for you.
Dude, there is nothing wrong with that! Sometimes I wonder if I’m going waaaaaay overkill on these posts. Like people open them and say, “settled down guy, I’m just scrolling to the picture anyway.”